You can prove your identity visually by adding your name as a signature. As technology advances, more and more people are using digital tools like Microsoft Word to sign papers and conversations that are only available on computers. To be fair, it’s a lot easier this way, too. So, if you ever want to sign a document digitally, it may be helpful to learn how to insert an electronic signature into a Word document. This article explains the process of adding a signature to Word, including how to do it digitally and by hand.
How to insert a handwritten signature in Word
You may use a handwritten signature in Word by following these steps:
1. Sign on a paper and take a picture of it
First, just sign on paper and take a picture of it. Ensure that your signature is clear and readable and that your photo is of a good enough quality to show up properly in a Word document. Write in dark ink on a white piece of paper, use a steady hand, and shoot the picture in a well-lit area to make sure your signature is visible.

2. Save the image to your computer
Next, save the picture on your computer. There are several ways to accomplish this, like copying the paper with a scanner and generating a digital image on your computer. You can also use a cell phone to capture your signature photo and then wirelessly transmit the photo to your computer by using its Bluetooth sharing options.
Another way to accomplish this is to text or email the picture to your personal phone number or email address, then open the message on your computer to see the attachment and save it.
You can also decide to improve the photo’s quality by editing it. You can change parameters like exposure and contrast to make sure your signature is visible.
3. Resize the picture
You can then crop the photo already on your computer as a file since other objects, such as a table or the paper’s edge, could be distracting when it shows up on a page. You can crop your photo so that only the signature shows by placing the boundaries outside your writing.

4. Save the photo as a new file
You can save the photo as a new file after trimming it. Just right-click on the picture and select “Save As.” When doing this, make sure the picture shows up in Word by using one of the following file formats: .jpg, .png, .bmp, and .gif

5. Insert the photo into Word
In Word, select the “Insert” tab.
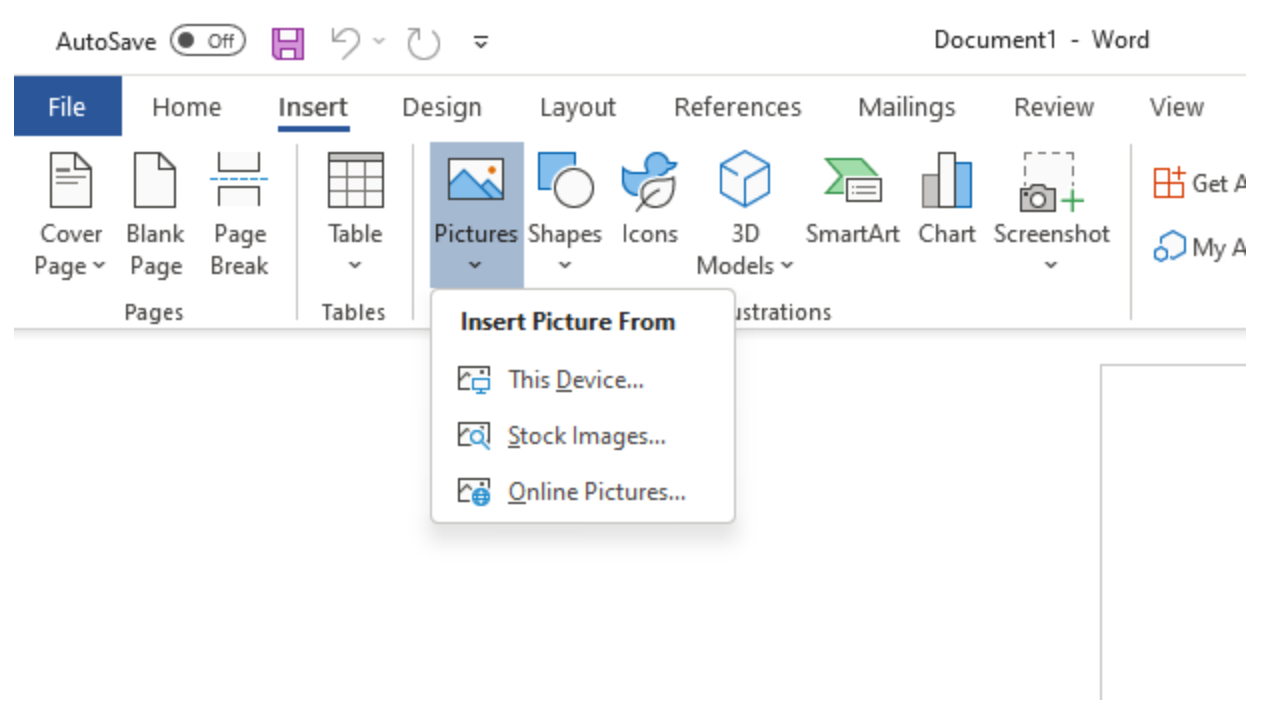
The next step is to select the “Insert” tab at the top of the Word window after clicking on the section of the page where you want your signature to appear. A selection of options shows when you click on this tab. To add a photo to the Word document, select “Picture” from this menu to bring up a window with further options.

6. Select and arrange your picture on the page.
Finally, select your snapshot and place it where you want it to appear. Click on the cropped image in the “Picture” window. The image can then be resized and moved to the desired location on the page.
Create your digital signature in Microsoft Word
Now, let’s discuss image-based signatures, including how to make them and add them to Word documents.
1. Use the Word’s drawing tool
We’ll start by giving a brief introduction to Word’s drawing tool. Your Microsoft Office version affects how you use this application. If you are using Microsoft 365, you should follow these guidelines.
Find the Draw tab on the Ribbon to open the drawing tool. You can add it if it’s not already there. To customize the ribbon, right-click on it and choose Customize the Ribbon.

Find and pick the Draw command, then click Add >>. To finish, adhere to the in-app directions. Choose your writing instrument from the Drawing Tools group after selecting the Draw tab from your menu bar. Next, click to activate the Draw Input Mode if Draw mode has not already been activated. You may now draw your signature with your finger, stylus, touchpad, or mouse, depending on the accessories that come with your device. To get out of Draw mode, click the mouse cursor icon. From the contextual menu, choose your signature and use Word’s wrapping options to position it on the page.
Readability is crucial if you plan to scan or take a picture of your signature. Verify that the photo or scan was taken using high-resolution settings and that the signature is clear and distinct.
2. Save the image file in a different format
Again, as previously stated, ensure that the photo or scan you created of your handwritten signature is in a file format that may be used for signatures, such as.bmp or.jpg. If the backdrop of your Word document has a fill pattern or color, you can also save it as a.png or.gif file because both of these image formats allow transparent backgrounds. Please take note that Office 365 documents cannot import.eps files.
3. Transfer the image or scan to the computer running Microsoft Word
It’s simple to add your signature image to Microsoft Word after you've created or scanned it: Choose Insert > Pictures > This Device for Windows devices.

To add a picture to your document on a Mac, select the desired spot first. Find your image in iPhoto, Photo Booth, or the file system on your Mac by selecting Pictures on the Insert tab. In both situations, pick the signature image and utilize the resize handles to change its size. Additionally, you have a number of choices for cropping the picture and aligning text with the image.
How to insert a digital signature in Word
You can make the dotted line to sign in Word using the following steps.
1. Click where you want to add your signature
The first step in creating a digital signature in Word is to click on the page in the place where you want to place it. This tells the program where to input the signature after making it. You can typically add a signature on any area of a Word document, but the most common placement for one is at the bottom of the page or after any other text.
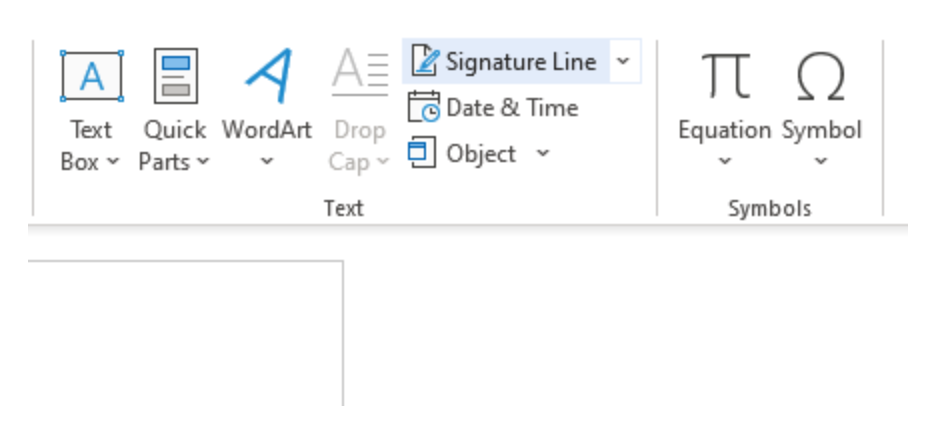
2. Find the “Signature Line” option under the “Insert” tab
When you open Word, the “Insert” tab usually appears in the menu bar at the top of your window. Once you figure out where to place your signature, you can open this tab to review the available options. Then, you can find the option labeled “Signature Line” and click on it to open a new pop-up window with another options menu.

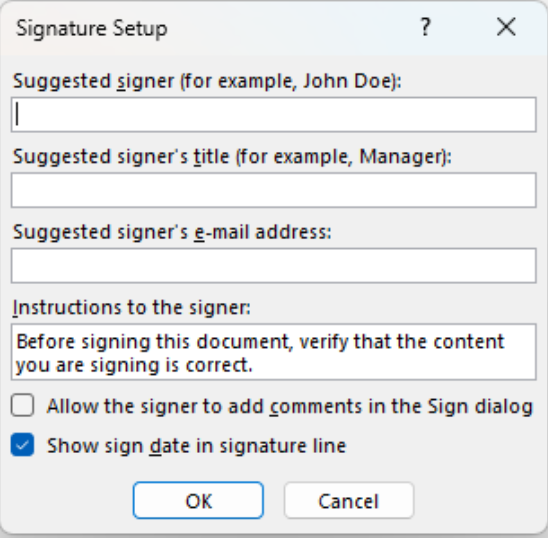
3. Input your information in the pop-up window
Once the pop-up window for the “Signature Line” feature appears, you can start adding the information you want to appear in your signature. This most often includes your name, but you might also add other details, such as your phone number and email address. Extra details are most common in signatures you plan to add at the end of professional communications, such as business letters or formal emails.

Later versions of Word might also offer a feature that allows users to draw a signature in this window using their mouse or trackpad. This can cause the digital signature to appear similar to a handwritten signature. This may be helpful if you want to convey a sense of authenticity and professionalism in your document.
4. Finalize your signature
After you add all the details you want to include to the pop-up window's content fields, it's time to finalize your signature. You can complete your signature by clicking the “OK.”
##finalize-signature.png
Then, the signature appears where you initially clicked on the page. Some versions of Word might allow you to save this signature so you can quickly access it and insert it into other documents in the future.

Limitations of Using Microsoft Word to Sign Contracts
Microsoft Word is flexible, but there are several limitations when you want to sign contracts or manage other confidential documents. Here are some key eSigning features lacking in Word:
Inefficiency in Bulk Signing
Without the features of bulk or mass-signing capabilities, signing multiple sections in the same document or signing several documents at once becomes clumsy. Word, unfortunately, does not offer these functionalities; thus, it is slightly less optimized for dealing with contracts that involve multiple signings efficiently.
Lack of Document Tracking and Storage Features
To manage intricate contracts, tracking signed documents and securely storing them is an important requirement. Microsoft Word cannot provide these features since it is not built for document management or secure record keeping. Although some of the other Office tools enable the functionalities, the application itself does not support them.
Lacking Advanced eSignature Functions
In terms of advanced electronic signature functionalities, Microsoft Word also doesn't make the cut. Features like:
- Mobile-friendly guided forms
- Processable signing workflows (e.g., conditional fields, predefined sequential or parallel signing orders)
- Automated email notifications and reminders to ensure timely completion of signing tasks
These specialized tools streamline the process and help avoid delays, like lost or overlooked signing requests buried in an inbox.
